Getting Started: Your First Pipeline in TangleML
Build and run your first machine learning pipeline in under 10 minutes using the TangleML editor's drag-and-drop interface.
Want to try it now?
Overview
This guide walks you through creating a complete XGBoost machine learning pipeline using TangleML's standard library components. You'll learn how to:
- Access and use standard library components
- Connect components to create data flows
- Run and monitor pipeline execution
- Troubleshoot common issues
Accessing standard library components
The standard library provides pre-built components for common ML tasks. To access it:
- Click on Standard Library Components in the left panel.
- Navigate to the Quick Start folder for beginner-friendly components.
- Browse available components organized by category.
Each component in the standard library is fully documented. To see implementation details, click the component info dialog and check the Implementation tab.
Building your first pipeline
Step 1: Add a data source
Start by adding the Chicago Taxi Trips Dataset component to your canvas:
- Find the component in the Quick Start folder.
- Drag and drop it onto the canvas.
- This component fetches data from Chicago's open API using a simple cURL command.
You can run the pipeline at this point and check the results in the Outputs or Artifacts tab.
Step 2: Add training and prediction components
Next, add the ML components:
- Drag Train XGBoost Model on CSV onto the canvas.
- Drag XGBoost Predict on CSV onto the canvas.
- You'll now have three components ready to connect.
Step 3: Connect components
Create the data flow by connecting component outputs to inputs:
-
Connect the dataset to training:
- Drag from the
tableoutput of Chicago Taxi Trips Dataset. - Connect to the
training_datainput of Train XGBoost Model.
- Drag from the
-
Connect to prediction component:
- Connect the same dataset
tableoutput to the prediction component'sdatainput. - Connect the training component's
modeloutput to the prediction component'smodelinput.
- Connect the same dataset
You'll notice red dots on the map, which indicate required inputs that need configuration. The pipeline can't run until all validation errors are resolved. We'll fix these in the next step.
Step 4: Configure required parameters
Some components need additional configuration:
- Click on the Train XGBoost Model component.
- In the arguments editor, set the Label Column Name (for example,
tips). - Set the same label column name for the prediction component.
- Red validation dots will disappear when properly configured.
TangleML automatically saves your canvas changes every time you make a change. You can verify auto-save status by looking for the Last saved timestamp in the Pipeline Actions section of the left panel.
Step 5: Running and troubleshooting your pipeline
Now that all components are connected, let's run the pipeline:
- Click the Submit Run button on the left panel to submit your pipeline.
- Components will transition through states:
Queued→Pending→Running→Succeeded(orFailed)
You'll see that the component failed. That's OK! Let's troubleshoot it.
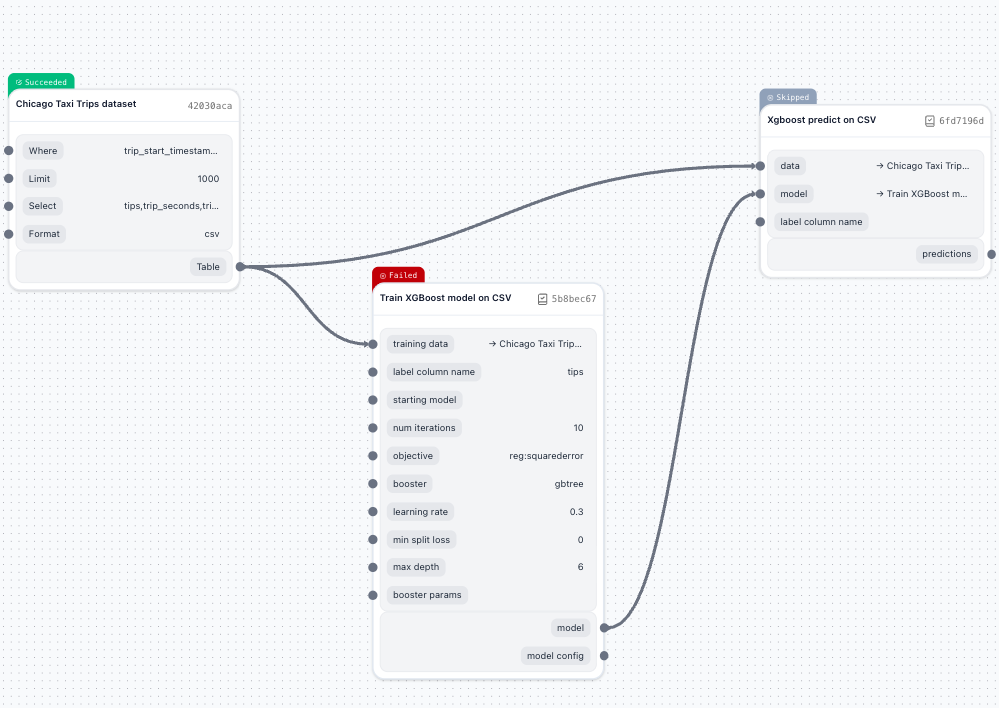
Tasks that are dependent on failed tasks will be immediately marked as "Skipped".
Use logs to troubleshoot pipeline failures
The most common way to troubleshoot a pipeline failure is to check the logs.
-
Click on the failed component
-
Select View Logs to see detailed error messages.
- You can use Fullscreen button to see the logs in full screen mode.
- Search the logs by pressing CMD/CTRL + F to search for specific text in the logs.
Different components produce different error messages. You need to know specifics of the component to troubleshoot the pipeline failure.
-
You'll see an error message related to our component:
Check failed: valid: Label contains NaN, infinity or a value too large.Looks like some of the rows in our dataset have empty values in the label column.
-
We'll fix this in the next step using a standard library component.
To return to the editor mode, click the Inspect button in the right context panel.
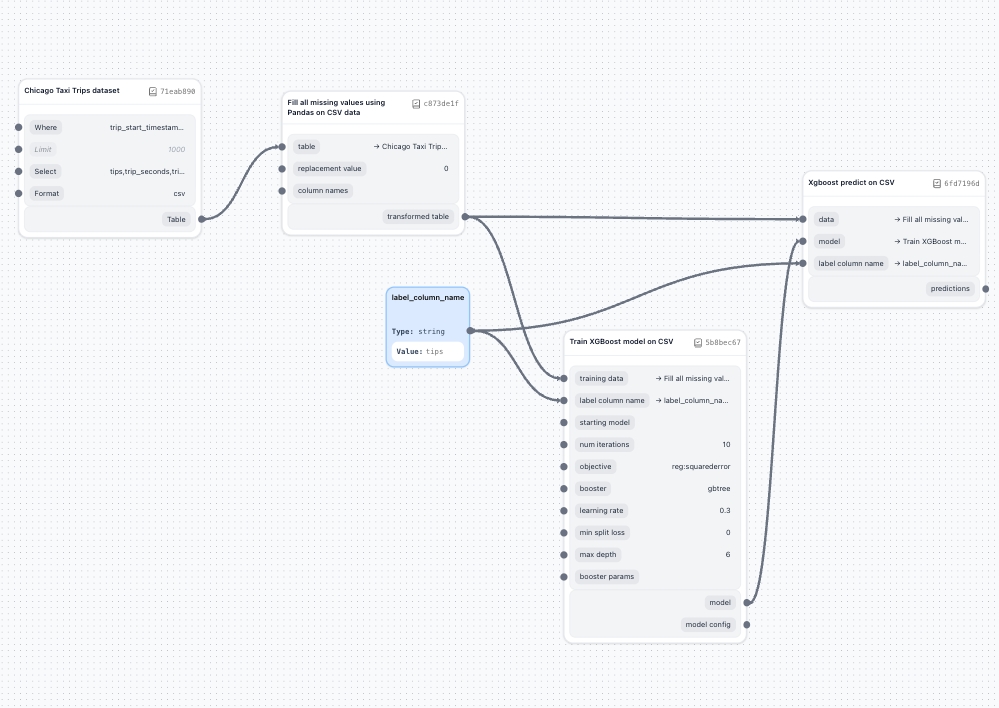
Use components to fix data quality issues
-
Search for and add the Fill All Missing Values on CSV component.
-
Drag it onto the canvas between your dataset and training components.
-
Redirect connections:
- Connect dataset
tableoutput → Fill Missing Valuesdatainput. - Connect Fill Missing Values
tableoutput → Training and Predictiondatainputs.
- Connect dataset
-
Re-run the pipeline by clicking Submit Run.
Notice that some tasks executed instantly when you reran the pipeline. TangleML caches deterministic component results. When you re-run a pipeline, any tasks with identical component digest and inputs will reuse cached outputs, dramatically speeding up iteration time. You'll see cached components complete instantly with a Succeeded status.
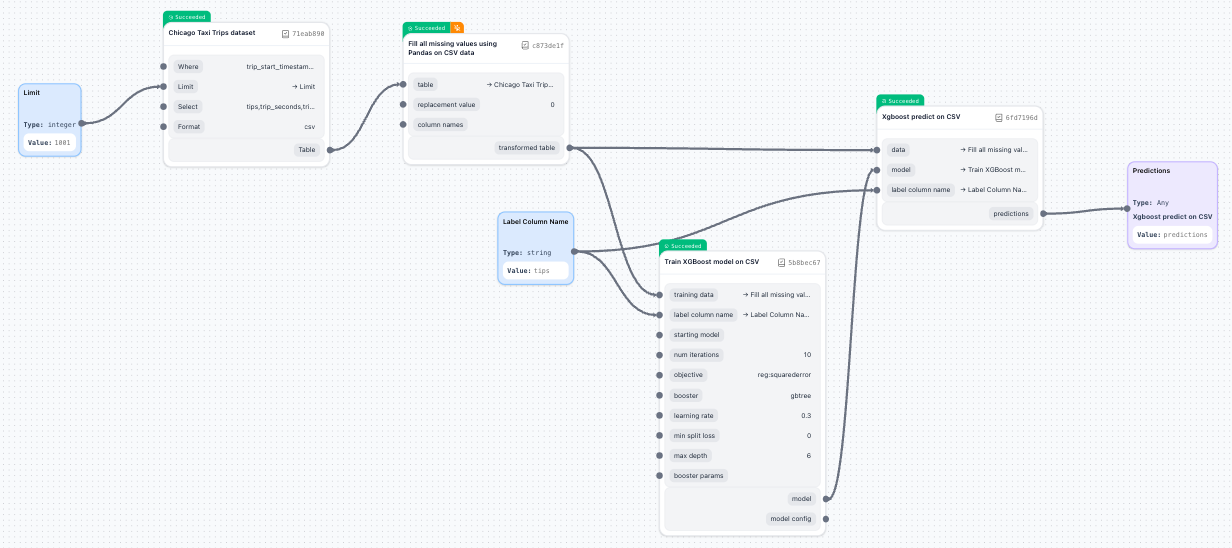
Step 6: Using input nodes for repeated values
Avoid repetition and make your pipeline more maintainable by using input nodes as variables:
-
Add an input node:
- From the component panel, drag an Input node onto the canvas.
- Name it descriptively (for example,
label_column_name). - Set its value to
tips(or your label column name).
-
Connect the input node:
- Connect the input node's output to both:
- Train XGBoost Model's
label_column_nameparameter - XGBoost Predict's
label_column_nameparameter
- Train XGBoost Model's
- Connect the input node's output to both:
Using input nodes as pipeline-wide constants or variables is a great trick and has some benefits:
- Change the value once to update all connected components
- Makes pipelines more readable and maintainable
- Reduces configuration errors
Summary
You've successfully created and run your first machine learning pipeline in TangleML! The platform's visual interface, combined with automatic caching and comprehensive logging, makes it easy to iterate quickly on ML workflows. Remember that parallel execution and result caching will significantly speed up subsequent runs as you refine your pipeline.